
5. BSP
The Board Support Package is composed by a set files, patches, recipes, configuration files, etc. This chapter gives you the information you need when you want to customize something, fix a bug, or simply learn how the all thing has been assembled.
5.1. U-boot
5.1.1. Get sources
The bootloader used by Microzed is u-boot. If you want to browse/modify the sources first you have to get them. There are two viable ways to do that:
- if you already built Microzed’s bootloader with Bitbake, then you already have them on your (virtual) disk, otherwise
- you can download them.
Bitbake will place u-boot sources under:
/path/to/build/tmp/work/microzed-poky-linux-gnueabi/u-boot-xlnx/v2014.01-xilinx+gitAUTOINC+2a0536fa48-r0/gitthis means that within the virtual machine you will find them under:
/home/architech/architech_sdk/architech/microzed/yocto/build/tmp/work/microzed-poky-linux-gnueabi/u-boot-xlnx/v2014.01-xilinx+gitAUTOINC+2a0536fa48-r0/gitWe suggest you to don’t work under Bitbake build directory, you will pay a speed penalty and you can have troubles syncronizing the all thing. Just copy the sources some place else and do what you have to do.
If you didn’t build them already with Bitbake, or you just want to make every step by hand, you can always get the sources from the Internet by cloning the proper repository and checking out the proper commit:
cd ~/Documents
git clone git://github.com/Xilinx/u-boot-xlnx.git
cd u-boot-xlnx
git checkout 2a0536fa48db1fc5332e3cd33b846d0da0c8bc1e
and in order to compile the u-boot, run the following commands:
source ~/architech_sdk/architech/microzed/toolchain/environment-nofs
export LDFLAGS="-L ~/architech_sdk/architech/microzed/toolchain/sysroots/armv7a-vfp-neon-poky-linux-gnueabi/usr/lib/arm-poky-linux-gnueabi/4.9.1/"
make ARCH=arm distclean
make zynq_zed_config
USE_PRIVATE_LIBGCC="yes" make all
5.1.2. The Cross-Toolchain
Suppose you modified something and you want to recompile the sources to test your patches, well, you need a cross-toolchain (see Cross compiler Section). If you are not working with the virtual machine, the most comfortable way to get the toolchain is to ask Bitbake for it:
bitbake meta-toolchainWhen Bitbake finishes, you will find an install script under directory:
Host
path/to/build/tmp/deploy/sdk/
Install the script, and you will get under the installation directory a script to source to get your environment almost in place for compiling. The name of the script is:
environment-setup-armv7a-vfp-neon-poky-linux-gnueabiAnyway, the environment is not quite right for compiling the bootloader and the Linux kernel, you need to unset a few variables:
unset CFLAGS CPPFLAGS CXXFLAGS LDFLAGSInside the virtual machine, the toolchain is already installed under:
/home/architech/architech_sdk/architech/microzed/toolchainIn the very same directory there is a file, environment-nofs, that you can source that takes care of the environment for you when you want to compile the bootloader or the kernel
source /home/architech/architech_sdk/architech/microzed/toolchain/environment-nofs5.1.3. Build
Ok, now you a have working environment to compile u-boot, just do:
cd ~/Documents/u-boot-xlnx/
make mrproper
make zynq_zed_config
make [-j parallelism factor] all
if you omit -j parameter, make will run one task after the other, if you specify it make will parallelize the tasks execution while respecting the dependencies between them. Generally, you will place a value for -j parameter corresponding to the double of your processor’s cores number, for example, on a quad core machine you will place -j 8.
Once the build process is complete, you will find u-boot file in your sources directory, that’s your binary. However, u-boot file alone is not able to boot the board, you are going to need a First Stage Bootloader and a Bitstream to make the board properly boot.
5.2. Linux Kernel
Like we saw for the bootloader, the first thing you need is: sources. Get them from Bitbake build directory (if you built the kernel with it) or get them from the Internet.
Bitbake will place the sources under directory:
/path/to/build/tmp/work/microzed-poky-linux-gnueabi/linux-xlnx/3.17-xilinx+gitAUTOINC+7b042ef9ea-r0If you are working with the virtual machine, you will find them under directory:
/home/architech/architech_sdk/architech/microzed/yocto/build/tmp/work/microzed-poky-linux-gnueabi/linux-xlnx/3.17-xilinx+gitAUTOINC+7b042ef9ea-r0We suggest you to don’t work under Bitbake build directory, you will pay a speed penalty and you could have troubles syncronizing the all thing. Just copy them some place else and do what you have to do.
If you didn’t build them already with Bitbake or you just want to do make every step by hand, you can always get them from the Internet by cloning the proper repository and checking out the proper hash commit:
cd ~/Documents
git clone -b xlnx_3.17 git://github.com/Xilinx/linux-xlnx.git
cd linux-xlnx
git checkout 7b042ef9ea5cc359a22110c75342f8e28c9cdff1
and by properly patching the sources:
patch -p1 < ~/architech_sdk/architech/microzed/yocto/meta-microzed/recipes-kernel/linux/linux-xlnx/3.17/0001-Updated-the-TI-Wilink8-driver-to-R8.5.patch
patch -p1 < ~/architech_sdk/architech/microzed/yocto/meta-microzed/recipes-kernel/linux/linux-xlnx/3.17/0002-Patching-kernel-to-adapt-TI-Wilink8-driver.patch
patch -p1 < ~/architech_sdk/architech/microzed/yocto/meta-microzed/recipes-kernel/linux/linux-xlnx/3.17/0003-Fixed-TI-Wilink8-driver-with-kernel-structure.patch
patch -p1 < ~/architech_sdk/architech/microzed/yocto/meta-xilinx/recipes-kernel/linux/linux-xlnx/3.17/tty-xuartps-Fix-RX-hang-and-TX-corruption-in-set_termios.patch
cp ~/architech_sdk/architech/microzed/yocto/meta-microzed/recipes-kernel/linux/linux-xlnx/3.17/defconfig .config
If you don’t use our SDK then use the following commands to patch the sources:
cd ~/Documents
git clone git://git.yoctoproject.org/meta-xilinx.git
cd meta-xilinx
git checkout 7f759048bb0aeef3c0b3938be81d2bcade7acb7e
Download the config file and put it in the linux directory, renamed .config:
cp ~/Downloads/config ~/Documents/linux-xlnx/.configSource the script to load the proper evironment for the cross-toolchain (see Cross compiler Section) and you are ready to customize and compile the kernel:
source ~/architech_sdk/architech/microzed/toolchain/environment-nofs
LOADADDR=0x0008000 make uImage -j <2 * number of processor's cores>
Now you need compile the devicetree file:
cp ~/architech_sdk/architech/microzed/yocto/meta-microzed/conf/machine/boards/microzed/microzed* arch/arm/boot/dts/
make microzed-mmcblk0p2.dtb
By the end of the build process you will get uImage and devicetree under arch/arm/boot.
Host
~/Documents/linux-xlnx/arch/arm/boot/uImage ~/Documents/linux-xlnx/arch/arm/boot/dts/microzed-mmcblk0p2.dtb
Enjoy!
5.2.1. Build from bitbake
The most frequent way of customization of the Linux Kernel is to change the .config file that contains the Kernel options. Setup the environment and run:
bitbake virtual/kernel -c cleanall
bitbake virtual/kernel -c menuconfig
a new window, like the following one, will pop-up:
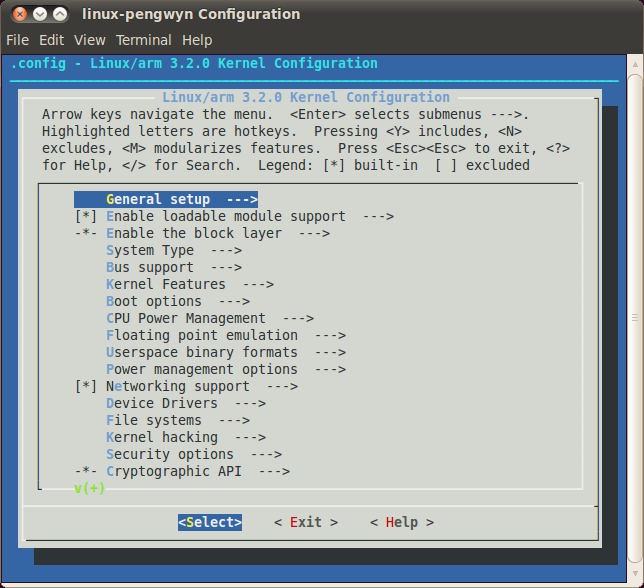
follow the instructions, save and exit, than you ready to generate your preferred image based on your customized kernel. If you prefer, you can build just the kernel running:
bitbake virtual/kernelAt the end of the build process, the output file (uImage.bin), along with the built kernel modules, will be placed under tmp/deploy/images/microzed/ inside your build directory, so, if you are building your system from the default directory, the destination directory will be /home/architech/architech_sdk/architech/microzed/yocto/build/tmp/deploy/images/microzed/.
5.3. Meta Layer
A Yocto/OpenEmbedded meta-layer is a directory that contains recipes, configuration files, patches, etc., all needed by Bitbake to properly “see” and build a BSP, a distribution, a (set of) package(s), whatever. meta-xilinx is a meta-layer which defines the BSP for Microzed device, Microzed included. You can get it with git:
git clone -b dizzy https://github.com/architech-boards/meta-microzed.gitThis layer depends with this one which defines the BSP for Xilinx devices:
git clone git://git.yoctoproject.org/meta-xilinx.gitcd meta-xilinx/git checkout cb7329a596a5ab2d1392c1962f9975eeef8e4576
Please, refer to the README file contained inside the meta-layer directory.
The machine name corresponding to Microzed is microzed.
5.4. Root FS
The final root file system will be packaged as a .tar.gz file that, at the end of the build process, Bitbake will let you find it under directory:
/path/to/yocto/build/tmp/deploy/images/microzed/this means that within the SDK the actual path of the directory is:
/home/architech/architech_sdk/architech/microzed/yocto/build/tmp/deploy/images/microzed/To deploy the root file system, you are going to need an SD card with two partitions on it.
The first partition must be formatted as FAT16, its size must be sufficient to contain all the following files (64MB are more than enough):
- UBOOT.BIN, read directly by the processor at boot, containing the first stage bootloader, the bitstream (optional), and u-boot
- uEnv.txt, the bootscript with customizations
- uImage, the Linux kernel
- devicetree.dtb, the device tree binary file
To have a better understanding of those components and how to boot the board please refer to Let’s boot Section.
The second partition, our root file system partition, can be formatted as EXT2.
We assume that the second partition of the SD card gets mounted (in your SDK virtual machine) under:
/media/rootfsWarning
If that’s not the case for your configuration, please find out what is the proper mounting point for such a partition on your system and replace it in the following instructions.
Untar the file corresponding to your root file system inside such a partition:
sudo rm -rf /media/rootfs/*
sudo tar -xzf /home/architech/architech_sdk/architech/microzed/yocto/build/tmp/deploy/images/microzed/<image>-microzed.tar.gz -C /media/rootfs/
where <image> is the name of the recipe you used to build your root file system. For example, if you built core-image-minimal-dev with Bitbake, then the name of the tarball will be core-image-minimal-dev-microzed.tar.gz
Important
sudo password is architech